In a nutshell
- 🧼 Dish soap + steam team-up: surfactants cut surface tension so vapour creeps under grime; in about 30 seconds, baked-on grease loosens and wipes away.
- ⚙️ Step-by-step: add 200–250 ml water and a pea-sized squeeze of dish soap to a microwave-safe mug, heat for 30–60 seconds, let steam rest 60–90 seconds, then wipe and dry.
- ⚠️ Safety first: use a microwave-safe container, open carefully to avoid hot steam, skip excess soap, clean the turntable and splash ring, and never run the unit dry.
- 🍋 Smart swaps: use lemon for odour and light film, vinegar for mineral spots and sticky sugars, while dish soap remains best for grease.
- 🕒 Quick upkeep: repeat weekly for a consistently clean, odour-free interior; for heavy messes, run the cycle twice and avoid abrasives that scratch surfaces.
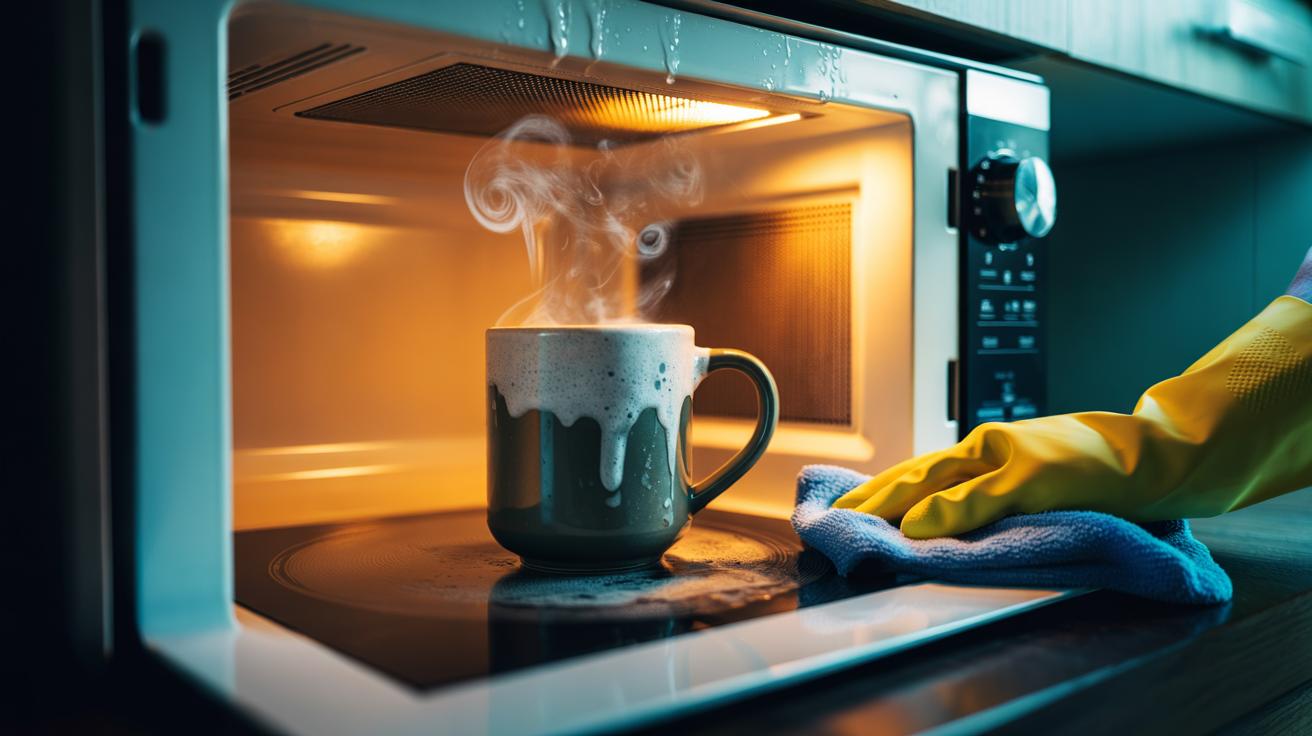
Spattered beans, buttery splashes, last night’s curry: the microwave collects everyday life in sticky layers. You could scrub. You could sigh. Or you could let dish soap do the heavy lifting. By exploiting heat, moisture, and a dash of surfactant chemistry, this trick softens grease and lifts grime in less than a minute. The headline promise is real: 30 seconds of heating transforms baked-on gunk into wipe-away residue. The secret isn’t magic; it’s controlled steam and surface science. Here’s how it works, why it’s safe, and the moments when lemon or vinegar might edge it out—plus the pro details most tutorials skip.
Why Dish Soap Works in a Microwave
At the heart of this hack lies a simple truth: surfactants reduce surface tension. A tiny squeeze of dish soap in water helps steam penetrate the grimy film that ordinary heat alone struggles to budge. Microwaves excite water molecules, producing rapid vapour that softens splatters on the walls and ceiling. The soap-laced condensate then creeps under the grease, destabilising the bond between fat and plastic or glass. In practical terms, steam does the loosening while soap handles the lifting. That’s the synergy. That’s why it feels instant.
There’s also a safety and convenience angle. Unlike aerosols or bleach-based sprays, a mug of soapy water doesn’t outgas harsh fumes into a small, sealed box. It’s kitchen-friendly, immediate, and forgiving. The moisture prevents scorching and helps regulate hotspots, making the cleaning phase afterwards almost frictionless. Two wipes, three at most. Corners that once resisted now smear away. 30 seconds of heat, a minute of rest, a calm, clean interior. The alchemy is household physics, not hype.
Step-By-Step: The 30-Second Steam Clean
Use a microwave-safe mug or bowl. Add about 200–250 ml of tap water and a pea-sized squeeze of dish soap. Swirl until lightly sudsy—no foam storm needed. Place the vessel centrally in the microwave with the turntable engaged. Heat on full power for 30 seconds. For older models or stubborn grime, go to 45–60 seconds. Then stop. Let the door stay closed for 60–90 seconds to trap steam where it matters. Open carefully, remove the mug, and wipe the cavity with a damp cloth. Streaks vanish. Odours ease. Shine returns.
Timing tweaks are straightforward. Powerful modern units may need only half a minute; compact dorm-room models may prefer a little more. If the mess is epic—think cheese explosions—run the cycle twice. Finish with a dry cloth for a smear-free finish. Avoid abrasive pads that haze plastic windows or scratch enamel. The beauty here is minimal effort, maximum payoff, and no sink-side soaking of trays or vents. It’s the fastest reset you can give a weekday kitchen.
Safety Notes and Common Mistakes
Respect heat and steam. The mug will be hot after the cycle, and the concentrated vapour inside a closed cavity can scald on contact. Crack the door slightly first, let a few seconds pass, then reach in with a cloth. Always use a microwave-safe container—no metal trims, no cracked pottery, no delicate crystal. Skip excessive soap; a small amount is potent under heat, and overdoing it can leave residue that needs extra rinsing. If you have a child’s lunch to reheat immediately after, wipe thoroughly and keep the interior dry.
Another frequent misstep: ignoring the turntable and the splash ring beneath. Lift the glass plate and wash it under the tap; it collects drips and harbours odours. If the vents along the back wall are filthy, dip a cloth in warm soapy water and dab gently—don’t flood. Never run the microwave completely dry for long periods, which can overheat components. And don’t substitute scented cleaning gels or hand soap; they’re not formulated for food-contact surfaces and may leave persistent perfumes. Keep it simple. Keep it safe.
When to Use Lemon, Vinegar, or Soap
Each method has a sweet spot. Dish soap excels with oily grime and protein splatters from soups, sauces, and leftovers. Lemon freshens brilliantly and lifts light film, offering a citrus deodoriser after fishy meals. Vinegar tackles mineral spots and sticky sugars but can smell sharp. Think of them as tools, not rivals. If grease is the villain, dish soap is the hero; if odour lingers, lemon writes the epilogue. For a deep clean, you can rotate methods across the week, keeping the cavity consistently easy to wipe.
| Method | Best For | Time Heating | Odour Control | Notes |
|---|---|---|---|---|
| Dish Soap + Water | Grease, general splatters | 30–60 seconds | Good | Low residue; wipe dry after |
| Lemon + Water | Light soil, fresh scent | 60–90 seconds | Excellent | Halve a lemon; squeeze and drop in |
| Vinegar + Water | Mineral film, sticky sugars | 60–90 seconds | Fair | Use white vinegar; ventilate well |
Whichever route you choose, finish with a quick pass of a damp cloth, then a dry one. Clean little, clean often, and the stubborn jobs never arrive. Routine beats rescue every time.
There’s a certain joy in pressing reset on a messy machine and getting a pristine box back in under two minutes. Grease gunk vanishes instantly when heat, steam, and a drop of dish soap team up, and the payoff is a microwave that actually smells like nothing at all. Simple tools, tiny effort, big result. The trick works on Tuesday night chaos and Sunday roast aftermath alike. If your microwave could talk, it would ask for this treatment weekly. Will you try the 30-second steam clean tonight, or will you put a lemon and vinegar face-off to the test first?
Did you like it?4.4/5 (20)